NOTE: This delay relay is meant for LED bulbs and filament bulbs. Max output for this unit is 8amps. Hid's can pull upwards of 10amps when starting and this can not be used for HID's.
NOTE* those with Tyga or Yoshi tag lighting you will need to keep the yellow wire going back to the tag light attached to the factory plug. These tag lights are AC powered only.
As close to plug n play as it can get with the Honda Grom. "converting your headlights to DC?" This is the perfect mod to do this and not have to add any wiring or cut any wires. This will make your headlights stay on constant. no more dimming lights when you are at a stop light. When doing this mod you will lose the "high beam" display from the cluster. The high/low beam will still function but it will not light up on the cluster when the high beam is on.
The high beam indicator can be made to work properly for $20 in the add-on section. We need your cluster sent to us to make this correction.
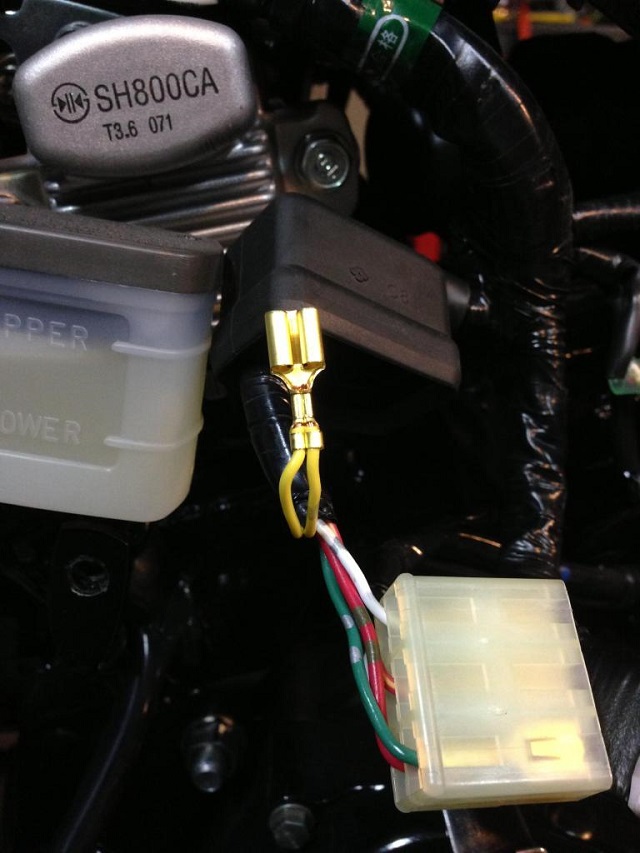
1: Remove Yellow connection from socket located behind the right fairing just behind the rear brake reservoir.

2: Insert the white wire with spade connection on it into the yellow plug and cover with heat shrink to protect from shorting.
3: Remove the 10mm bolt from grounding lug at the base of the fuel tank and install eyelit and reinstall 10mm bolt
4: Using the "NEW T tap connection" to connect other end of the jumper wire to the "Black" wire on the motorcycle side of the 3 pin connection that the taillight connects to.
To connect remove the grey/black end cap and place the black wire in the "U" channel and then tighten down the connection. The point inside will pierce the wire and make a connection. No cutting or tape needed.
The picture below shows which wire you need to connect to if you cannot see the black wire on the motorcycle side of the plug. If you view the orientation of the plug you will tap into the blue wire on this taillight shown.
This will delay the headlights from coming on for a set amount of time you choose. Any questions please ask.
After connecting the delay you can turn on the key to power it up. Delay will not work the first time it is used. It is default set to zero sec delay. To set your time you will count from the time you turn on the key till you want the light to turn on. When you reach this time push and hold the black switch on the delay and while holding turn off the key. You can then release the switch and turn the key back on to test the delay. If at anytime you wish to change the delay time you can repeat the steps above and the new delay time will be set.
If you would like us to preset the delay to a time you would like just note this in the comments section and we can set it up before shipping out to you.
)